Tutorial: Add Rhasspy local voice control to Home Assistant - Using a Raspberry Pi Zero with reSpeaker 2-mic HAT

Having reviewed the tutorial I wrote, there are a couple of areas I request your help:

  1. Review and recommend improvements, particularly to the introductory overview (Part 0)
  2. I got bogged down trying to write troubleshooting hints for anticipated problems that new users might encounter

I have decided that it makes sense to split the 37 A4 page document into 5 parts:

  • Part 0 - The ‘Big Picture’ overview
  • Part 1 - Setup Base station
  • Part 2 - Setup Rhasspy Satellite
  • Part 3 - Setup Rhasspy as Voice Asssistant
  • Part 4 - Next steps & Troubleshooting

Sorry about the formatting - particularly headings and indentation … didn’t translate so well into forum posts :frowning:

So saying, lets get started with the preamble…

Add Rhasspy local voice control to Home Assistant

Using a Raspberry Pi Zero with reSpeaker 2-mic HAT

Introduction

It seems obvious to me now that using a voice assistant means multiple microphone units distributed around the house (why have only one place where commands can be given?); and logically these satellites should be relatively cheap, with the bulk of the cpu-intensive work done on one shared base station.

Over the past year I have gone from a Home Assistant newbie - to a working Home Assistant with Rhasspy and 3 Satellites configuration. There were learning curves for Home Assistant, Rhasspy stand-alone, Rhasspy Base/satellite, External MQTT, HermesLEDcontrol, and Home Assistant Intents. That is a lot for a new user to get their head around, even someone with 30 years programming experience !

This document tries to fast-track you to a working, extensible Home Assistant voice assistant; without all the experimenting, dead ends and a learning curves I went through. I do however also want to pass on enough understanding of how the pieces fit together and the issues involved.

There are many many combinations of hardware and software which can do the same job. For this tutorial I have described a combination of components which work together for me.

Home Assistant and Rhasspy are particularly designed to be flexible and modular – so this document must NOT be misinterpreted as being the only (or even the best) way that Rhasspy can be configured – just what worked for me with the hardware and expertise I have.

This document assumes:
• A computer (could be a Raspberry Pi 3B/4 or PC) with Home Assistant OS already installed and running, which we will refer to as the Base machine.
• A Raspberry Pi Zero W (or preferably a Pi Zero W 2 or Pi 3A+) and reSpeaker 2-mic HAT (or adafruit Voice Bonnet), to be dedicated as a satellite.
• A MicroSD card (class 10) with 8GB or more capacity.
• desktop or other PC running linux, Windows, or MacOS (mainly for web browser to control the other devices).

This tutorial was written October 2022 and uses Home Assistant 2021.11, Mosquitto 6.0.1, and Rhasspy 2.5.11. Things can change fairly quickly with all the work being done on Home Assistant, Rhasspy and the other packages these use … so be aware that it may be out-of-date when you read it – hopefully only in minor details.

General comments

• Rhasspy and Home Assistant seem to be designed to be all things to all people, and they do it well, supporting an impressive number of hardware and software components. The down side is that there is no one correct path for a beginner to follow to a completed working system. Each hardware and software component has it’s own trade-offs.

• While Free/Open Source Software (FOSS) has some great advantages, being beginner-friendly (or even user-friendly) is rarely one of them. Developers are spending their own time unpaid (thank you so much guys), and quite reasonably they would rather be implementing the next great feature, than writing user-level documentation or beginners tutorials.
The best advice I can give is to stick to one new learning curve at a time !

• With Rhasspy everything is in the documentation … but it can be hard to find the information you want; and harder to understand what it means. Be prepared for several learning curves. Be warned that user forums are frequented by savvy amateurs or advanced users, and are are more friendly to people who show that they have put in effort to learn and understand, and tried to work through a problem themselves.

• Home Assistant and Rhasspy currently benefit from an active developer communities; resulting in HA releases monthly - however this also means that things do change fairly quickly – sometimes breaking an installation that was working.

3 Likes

Part 0 - The ‘Big Picture’ overview

Before getting stuck into how to create a Rhasspy Base + Satellite system, lets first take a step back and look at the big picture. I assume you are already familiar with the Voice assistant concept – that we can speak a command which will be performed by our Home automation system.
image

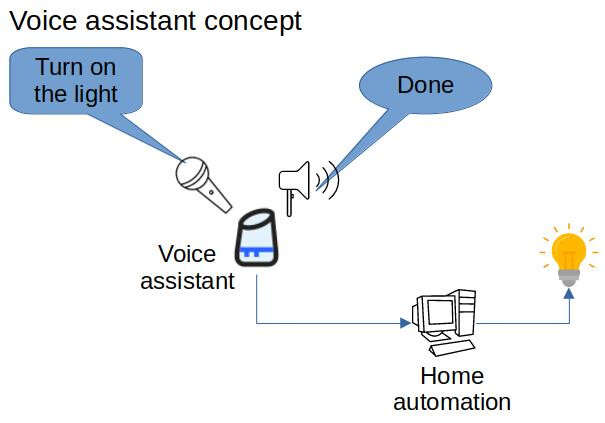
In the Google, Amazon, Apple and most other Home Automation systems the bulk of the work is performed “in the cloud”, which means out of your control. They have invested a lot of money and effort, and their products do work well … but (like facebook) their business model includes collecting information about you which they sell to pay the running costs of their cloud service.

In contrast, Home Assistant and Rhasspy are Open Source (free) projects with a focus on keeping your information and control local – ie within your home. I assume you are already familiar with Home Assistant, are wanting to add Rhasspy voice assistant, and that you want to use your voice assistant in multiple room through your home - and thus you want “Rhasspy’s Base + Satellite” configuration.
image

Overview of Rhasspy Voice Assistant

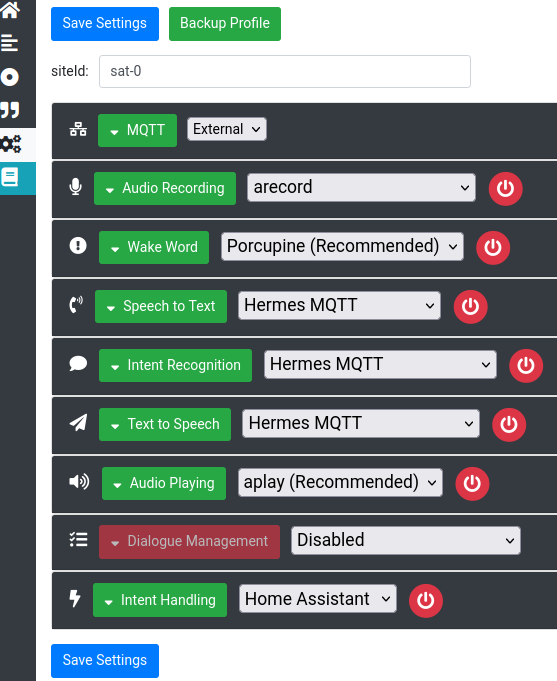
Rhasspy was intended as a toolkit and framework,covering 6 stages in processing a voice command plus a couple of related services, and providing multiple options at each stage. A while back Rhasspy was updated to allow these modules to run on different machines; thus allowing cheap Satellites plus more powerful shared central computer(s) doing the heavier processing tasks - and leaving it up to the user to decide what stage is performed where.

image Audio Input - Listens to the microphone and records commands
image Wake Word - Listens for the “wake” word - similar to “Alexa” or “hey Google”
image 
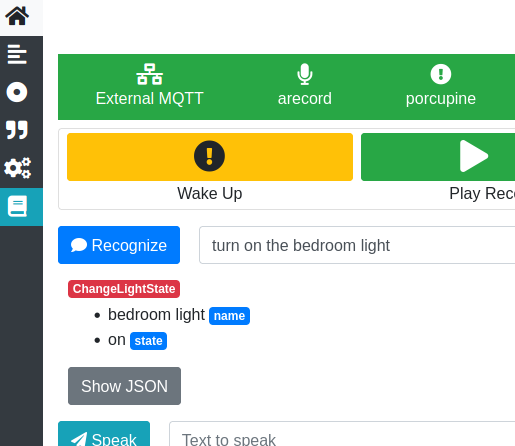
Speech Recognition - Converts voice commands into text. Eg “Turn the bedroom light on”
image 
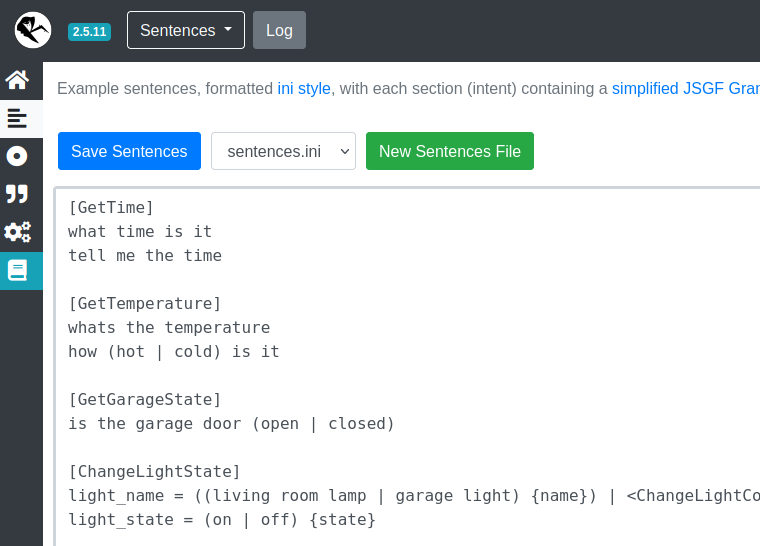
Intent Recognition - Recognises the users intention (called intents and slots) from text. Eg intent=switch_light, device=bedroom_light, action=on
image Intent Handle - Sends recognised intents to other software to be actioned. Eg home Assistant turns off a light
image Text to Speech - Translates text to an audio file.
image Audio Output - Plays audio through a speaker. Eg to speak “Bedroom light is on”

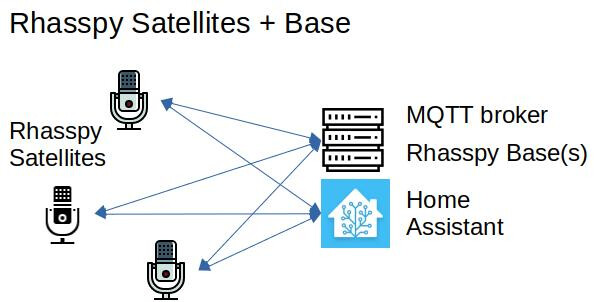
In Rhasspy’s terminology, “Satellites” are small cheap devices containing microphone and speaker placed in multiple rooms around the house; that communicate with a “Base station”. The Rhasspy Satellite hears the audio and then coordinates the processing flow, including calling services on the Base station to do most of the number crunching.

So far, the most popular Rhasspy configuration seems to be a Raspberry Pi Zero with microphone and speaker performing the Audio Recording and Wake-word detection and Audio Output for any response to the user. The compute-intensive tasks (Speech-To-Text , intent recognition, and Text-To-Speech) can better be performed by a more powerful shared computer (a RasPi 4 works fine, but a used PC is better). Historically Raspberry Pi single-board computers were cheap, readily available general purpose computers … which made them ideal for any enthusiast wanting to give it a try. Note that this is far from being the only division of services; or the best hardware combination !

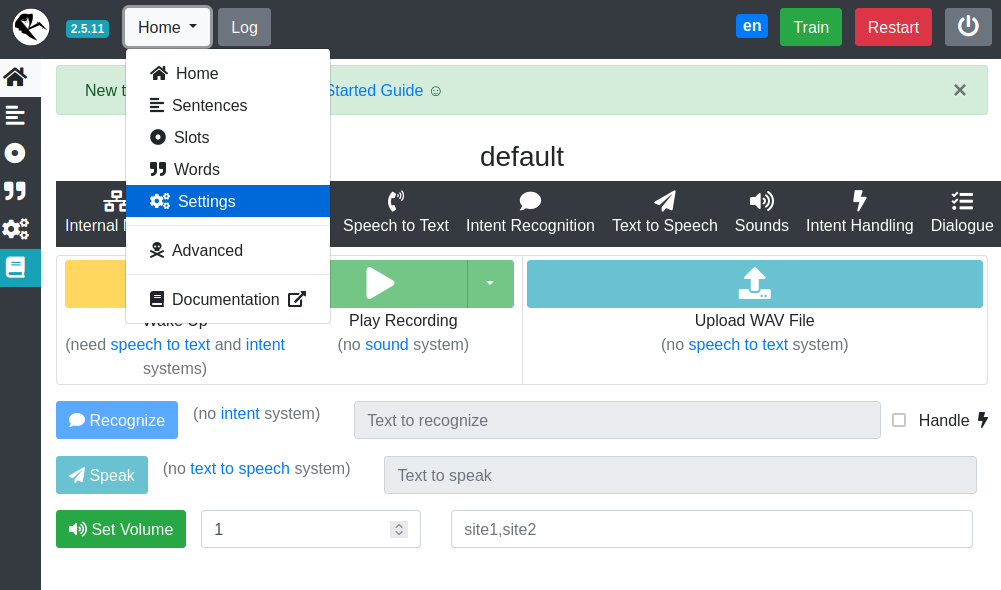
The same Rhasspy program and user interface runs on both the Satellites and Base station – which can be confusing - the difference is in which modules are enabled on each computer.

Along with Rhasspy, the Base station often runs 2 more “virtual machines” physically on the same machine running :
• MQTT message broker communicates between all the different components
• a separate system such as Home Assistant to action the voice commands.

Note that one computer can run all the stages, effectively being both Satellite and Base.

While Rhasspy’s documentation (Rhasspy) does contain all the information you need to build a Base + Satellite configuration, it is not organised in a way that makes it easy. That is the purpose of this tutorial.

Useful references: Rhasspy and https://community.rhasspy.org/

Rhasspy Base station computer

A Rhasspy Base station is a computer running Rhasspy, which provides compute-intensive services as required to the Satellites. Because of the higher CPU load (and the fact it is shared among all your satellites), an old PC, NUC, or Virtual Machine (VM) on a powerful computer is a popular choice … but a Raspberry Pi 3B or 4 will do fine to get started.

The Base station may have microphone and speaker connected and also operate as a Satellite.

Rhasspy Satellite computer

A cheap low-power computer with microphone and speakers. Several satellite units can be located throughout the house, providing a voice assistant service.

Note: that the hardware discussed here should NOT be considered required, or even a recommendation – it is simply what I had available and so what I used. The same general procedure in this tutorial applies whatever hardware you choose.
UPDATE Dec-2022: Since this was written Raspberry Pi’s have become hard to get and expensive. But there is currently no recommended option for satellites :frowning:

 Processor board

The Raspberry Pi Zero is cheap and small, with only one USB port and no wired Ethernet connector. We will use it “headless” (without keyboard or screen connected) through it’s built-in WiFi – so these are not actually limitations.

A Raspberry Pi Zero is certainly usable, however its slower processing speed results in a noticeable delay before you can speak your command – so if you don’t already have a Raspberry Pi to be a satellite, I strongly recommend spending a little more to get one of the newer Raspberry Pi Zero 2 W’s or a Raspberry Pi 3A+. These both have a faster processor and similar I/O for not much more cost. This tutorial is the same for these boards.

If you already have a spare Raspberry Pi 3B or 4 laying around, these also make a great satellite – though their extra hardware and cost is not needed for a satellite.

 Sound cards

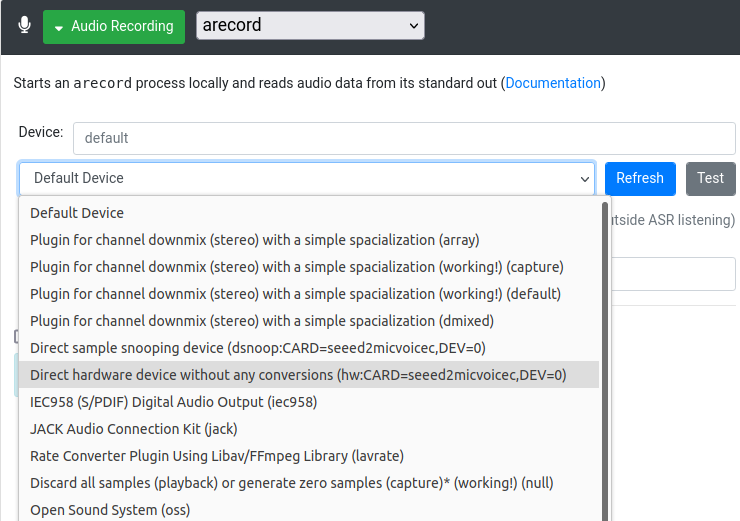
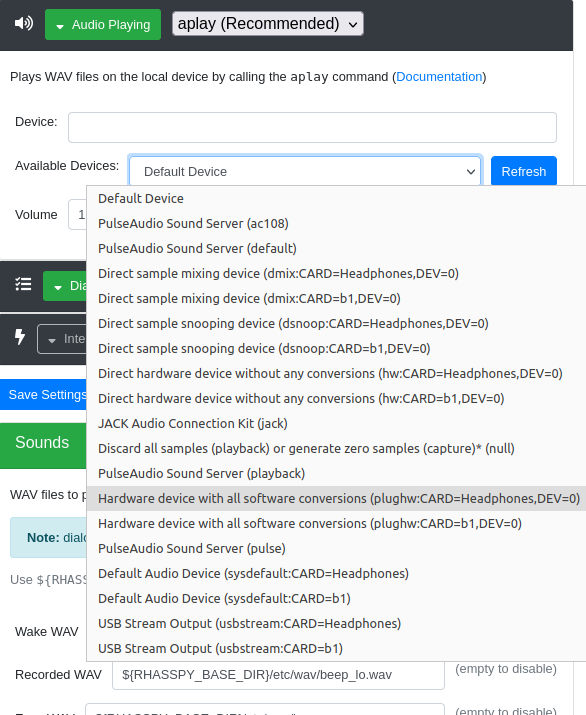
If using a Raspberry Pi, there are several variations of the 2-mic HAT which are equivalent, all using the seeed reSpeaker driver. These attach to the Raspberry Pi through its GPIO pins.

| Microphone card           | On-board Speaker                      |  other
|---------------------------|---------------------------------------|-----------------|
| Seeed ReSpeaker 2-mic HAT | Mono JST and headphone                | 3 LEDs, button
| Adafriut Voice Bonnet     | Left and right JST, and headphone     | 3 LEDs, button
| Seeed ReSpeaker 4-mic HAT | None. Will have to use Raspberry Pi’s | 12 LEDs

Note that while these are popular and convenient, the reSpeaker driver does not appear to take advantage of multiple microphones, so we do not automatically get better quality of audio.

The Raspberry Pi IQaudio Codec Zero uses a different chip to the reSpeaker devices, and has a different driver. I have not used this board, so cannot comment on it.

For voice assistant use, a simple USB sound card with speakers and microphone can also give similar results – but slightly different setup.

There are other multi-microphone units (such as ReSpeaker USB Mic Array - Seeed Wiki) with firmware providing features like Voice Activity Detection, Direction of Arrival, Beamforming, Noise Suppression, De-reverberation, Acoustic Echo Cancellation … but at a price.

  Cases

Curiously I have only found a couple of 3D printer models for cases to put your Satellite in.

Satellite Site-IDs

Rhasspy has been designed to cover the whole house by working with multiple Satellites, and so it is important to know which room a voice command was given in – ie which Satellite is processing the command – both to send the acknowledgement to the correct Satellite, but also because we want to be able to say “Turn on the light” and for Home Assistant to know which room the command was given in.

It is important that each Satellite is given a unique ID, and that all the Satellite IDs are listed at the Base station.

Related technologies and terms

When someone builds a house they start by investing in a toolbox full of gadgets to do different jobs, and pre-made sub-assemblies (like windows, kitchen cabinetry, even whole walls). In the same way, as computer programs evolved into Applications (a suite of programs working together) and became more complex it becomes desirable to build and use software tools. The tools may only be incidental to the end result, but it certainly helps to know which end of the hammer to hold.

In practice, there are quite a few concepts and technologies for a beginner to get their head around in order to get this project running. You don’t need to become an expert – but I have found FOSS (Free and Open Source Software) projects tend to focus on the technical details and often forget that an overview is an ideal starting point.
• Home Assistant OS and Rhasspy
• Containers, Virtual Machines, and Docker
• HACS (Home Assistant Community Store – for unauthorised add-ons)
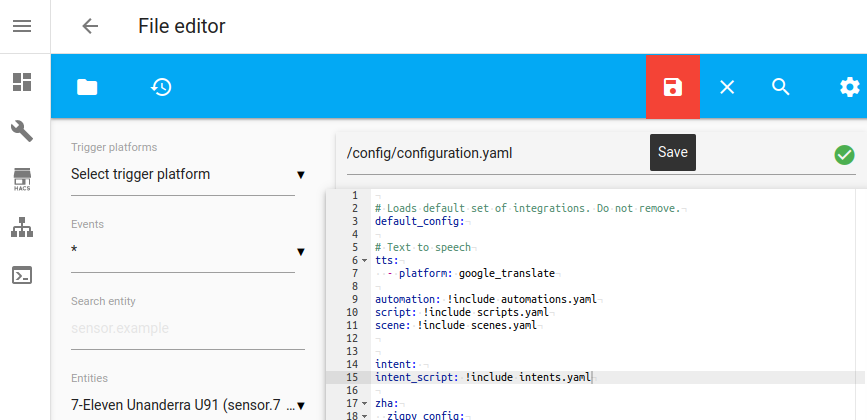
• File Editor and SSL/terminal (if satellite is headless) add-ons
• MQTT message broker
Lets take a moment to quickly look at some key terms and technologies which are used by Rhasspy.

hostname
All computers are identified on a network by its unique IP Address, like 192.168.1.100. These numbers can be hard for humans to remember, so a method of allocating a name to each computer is used, called a hostname.

On a Raspberry Pi, the hostname given to the machine is defined in raspi-config. To access the , follow the hostname with “.local” (eg: http://raspberrypi.local).

Having said that, I personally prefer to use the IP addresses rather than think up (and remember) meaningful hostnames.

Note that the “site-ID used by Rhasspy is not related to the machines hostname.

Home Assistant
An open source project providing a Home Automation system which is modular, expandable and runs locally – without reliance on cloud servers or external service providers.

Useful references: Documentation - Home Assistant and https://community.home-assistant.io/

Home Assistant can be installed on a wide variety of computers, and with 4 installation styles (mainly depending on how much of the maintenance you want to do yourself.

For this tutorial I assume you are using Home Assistant OS.

Virtual Machines, Containers, and Docker
To minimise unintended side effects, it became desirable to create a separate environment for each application. One approach is to create separate “virtual machines” which can run totally different operating systems independently, yet physically operate on the one physical computer.

Another approach is to place applications in separate “containers” which run using the host operating system.

Home Assistant OS automatically installs Docker, with Home Assistant running in one container, and allowing other applications (eg MQTT and Rhasspy) to run in their own containers, as though they were each in their own computer

HACS
There are many add-ons for Home Assistant, some official and integrated into Home Assistant (such as the File Editor, and MQTT Broker), and many more that are unofficial. Home Assistant Community Store (HACS) is where you can find and install many of these unofficial add-ons – similar concept to Google Play Store or Apple store.

File Editor
Home Assistant is moving to being configured through its Graphical User Interface (GUI) web page; but it still uses text configuration files under the hood – and the File Editor add-on is designed as an easy way to update Home Assistant’s text files.
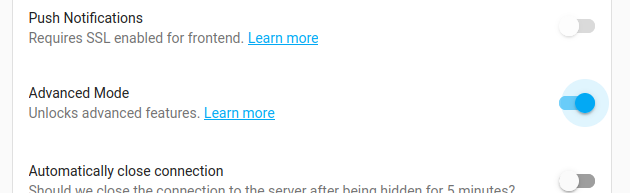
Headless operation
Home Assistant and Rhasspy are designed to run “headless” – that is without screen or keyboard connected. They are both controlled through their web pages, so you will need a standard PC computer (running linux, MacOS or Windows) with a web browser. You will also need a terminal program and the Raspberry Pi Imager or Etcher to format and load onto a microSD card.

Command Line (CLI)
Before the point and click Graphical User Interface (GUI), we would tell computers what to do by typing commands on a keyboard using the Command Line Interface. Since we don’t want a screen keyboard and mouse connected to every satellite, there is no point our satellite using a GUI, so we will use the command line.

The Raspberry Pi computers run a variant on the linux operating system. Some operations require higher privilege - which we prefix these commands with “sudo” to tell the computer to run them as the ‘superuser’.

Terminal / Secure Shell (SSH)
Normally a keyboard, mouse and monitor screen directly connected to the computer are used to enter commands and view the results; called the console terminal.

Linux also provides for remote terminals – a program running on another computer, which relays the users input and the host computers output, as though it is directly connected. SSH (Secure Shell) is the most common method for this, and is available in most Windows, macOS and linux Terminal programs. There are many alternatives such as telnet and puTTY.

SCP (SecureCopy) is part of SSH, and uses SSH to copy files to the remote system which is running SSH.

Mosquitto / MQTT
Mosquitto is an application which provides a MQTT (Message Queue Telemetry Transport) server, used to communicate messages between all sorts of applications and devices; without any knowledge of the messages themselves.

Normally we think of messages like postal letters or txt messages – sent from one address directly to another specific address or phone number. MQTT is more like a bulletin board where anyone can place a message card (publish a message) under a topic on the board, and everyone can read it (or subscribe to listen to copies of the message as they are published). This easily handles situations where no-one is publishing to that topic, no-one is listening, or there are multiple listeners.

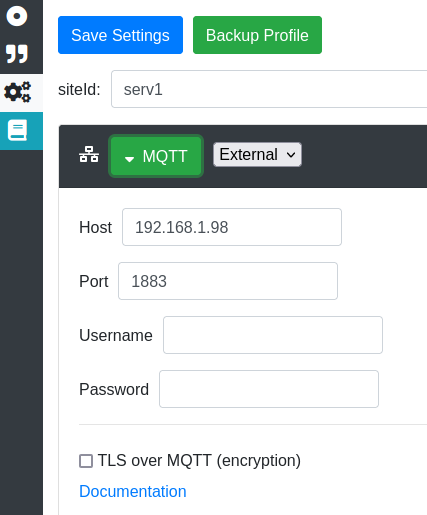
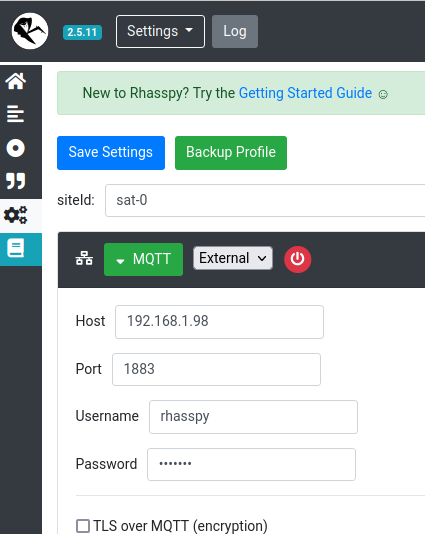
Rhasspy automatically installs Mosquitto MQTT broker for messaging between the Rhasspy modules running on that machine, called “Internal MQTT”. Because it is self-contained, it is set up with few settings; and is suitable where all the Rhasspy modules are running on the same machine.

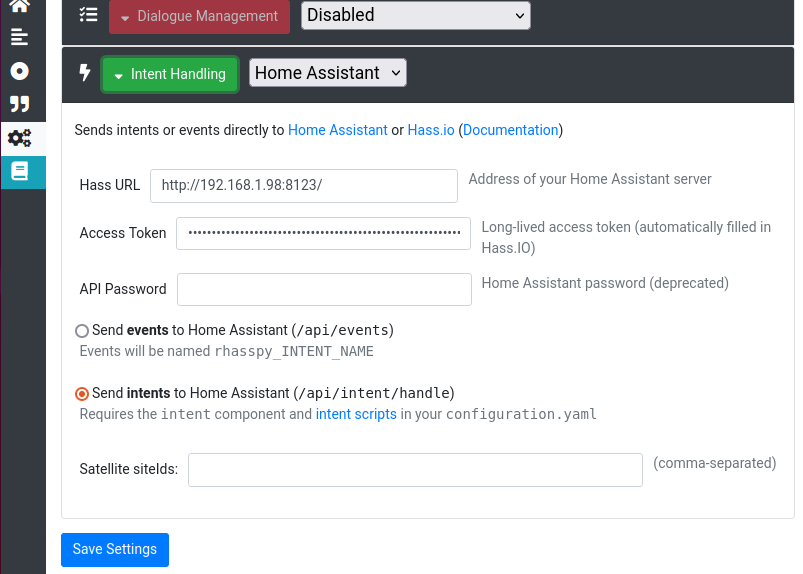
However a common External MQTT is required for communication between multiple satellite machines and/or multiple applications (eg driving the LEDs). In our case we will use Home Assistant’s Mosquitto MQTT Broker Add-on.

Useful references: MQTT - Home Assistant

Both Internal or External MQTT options are discussed in Tutorials - Rhasspy.

HermesLEDControl
Rhasspy provides audio responses via beeps to let you know the Wake word was recognised, that it has detected the end of a sentence, and it was unable to recognise a command. Since the reSpeaker boards have colour LED lights built in, we can use them to give visual as well as audio feedback.

The HermesLEDcontrol (HLC) module listens to the MQTT messages, and display various patterns on the reSpeaker LEDs to give visual feedback to the user.

Useful references: Home · project-alice-assistant/HermesLedControl Wiki · GitHub

Preparation

The traditional approach is to install one component at a time, following different tutorials. Since we have a vision of the end result and want to minimise the swapping between devices, I have chosen to do some things out of order. I suggest you tick off each step as you do it, so you don’t accidentally miss something that might not seem obvious.

There are several values which you can decide, which will be used throughout this document. I suggest you note down the vales for later reference:

• You will need to decide on unique Satellite IDs for the Base station and each Satellite. If you know where you’re going to place the satellite, you might use the location in the siteID, because, well it would be nice for Home Assistant to know that you’re speaking in the bedroom when you ask it to turn on the light ;-).
I called mine “base”, “sat-1”, “sat-0” because I have no imagination, and I was unsure which room I will end up putting them.

• Your values:

Base station ID: _____________ Satellite(s): _______________________________

• External MQTT requires a username and password. You can use an existing user, but I created a new Home Assistant user to be used by MQTT and Rhasspy.

Rhasspy MQTT username: ___________ password: _________________

• What do you wish to use as name (optional) and/or IP addresses for your machines:

base station hostname: ______________ IP: ________________

Satellite hostname: ______________ IP: ________________

Satellite hostname: ______________ IP: ________________

Part 1 - Setup Base station

If you already have a Rhasspy base station with one or more satellites, you can skip this section … otherwise let us set up your base station.

You do already have a computer running Home Assistant to use as the Rhasspy base station, right ?

Install Home Assistant Add-ons we will use later

  1. In Home Assistant, go to your profile page by clicking the button in the bottom left corner.
    It probably displays the first letter of your username or a picture, and will display the name of the current user when your mouse is over it.

  2. Look for “Advanced mode” and enable it.
    image

  3. From Home Assistant’s “Settings” menu, select “Add-ons”, then click the [Add-on store] button at bottom right of the page.

  4. Find the “File editor” Add-on and click on it. Click [Install]. I recommend setting “Start on boot” and “Show in sidebar” options, then click [Start]

  5. Find the “Terminal & SSH” Add-on and click on it. Click [Install]. I recommend setting “Start on boot” and “Show in sidebar” options, then click [Start]

  6. Find the “Mosquitto broker” Add-on and click on it. Click [Install]. I recommend setting “Start on boot” option. Click on “Configuration” tab, then make sure “Require Certificate” is off (unless you already know about SSL certificates), then the blue [Save] at the bottom of that section.
    Go back to the “Info” tab and click [Start]

  7. Create a new user for MQTT via your Home Assistant’s frontend Settings → People and then the “Users” tab. Click [+ Add new user]
    a. This name cannot be homeassistant or addons, those are reserved usernames.
    b. If you do not see the option to create a new user, ensure that Advanced Mode is enabled in your Home Assistant profile.

  8. To use the Mosquitto as a broker, go to the integration page and install the configuration with one click:

  9. Navigate in your Home Assistant frontend to Settings → Integrations.
    a. MQTT should appear as a discovered integration at the top of the page
    b. Select it and check the box to enable MQTT discovery if desired, and hit submit.

  10. In Home Assistant, select Settings > Devices & Services > Integrations and click the [+ Add Integration] button. Select the MQTT integration and install.
    Leave all the default values. Note that port number 1883 is used for normal MQTT. Do not add any user details into the logins section, as this will interfere with the built-in “homeassistant” user.

  11. External MQTT will need the Satellites to log into a MQTT Broker, by giving a username and password. You can use one of the existing Home Assistant users, but I chose to create a new user “rhasspy” to help distinguish between Rhasspy-related messages and messages from other users. .

  12. In Home Assistant, select Settings > People & Zones > Users, then click the [+ Add User] button, and add your new rhasspy user details.

Install Rhasspy Add-on to Home Assistant

If you are using Home Assistant OS and have not yet installed Rhasspy, do so now.

  1. In Home Assistant, select Settings > Add-On, Backup & Supervisor > Add-ons page, click the [Add-on store] button.

  2. In the Add-On Store page, click the 3 dots in top right corner, select “Repositories” and add “https://github.com/synesthesiam/hassio-addons”. Refresh the web page, and you should now see a section titled “Synesthesiam Hass.IO Add-Ons” at the bottom of the page, from which you can select “Rhasspy Assistant”.

  3. In the “Configuration” tab you can change the default language by changing the “en” under “profile name” to “fr”, “de”, or whichever language you wish. Scrolling down note the “Network Rhasspy web IU + API” is at port 12101. A base station probably doesn’t have microphone and speakers connected, and so the Audio Input and Output devices will have the value “Default”.

  4. If you have changed any of the settings (probably the language), click [SAVE] and restart Home Assistant.

  5. After restarting Home Assistant and starting Rhasspy, click on the [Log] tab and you will notice a lot of [DEBUBG] messages. You can click on [REFRESH] at the bottom to update the log display. After a while (could be a couple of minutes) messages will be added to the Log to indicate that the Rhasspy is ready to use:

[INFO:2021-10-16 23:04:51,033] rhasspyserver_hermes: Started
[DEBUG:2021-10-16 23:04:51,034] rhasspyserver_hermes: Starting web server at http://0.0.0.0:12101
Running on 0.0.0.0:12101 over http (CTRL + C to quit)
  1. Click on the [Info] tab and then on the [OPEN WEB UI] button to configure Rhasspy. Alternatively you can simply browse to port 12101 of your Base station (e.g. http://192.168.1.98:12101 ).

Configure Rhasspy as Base

Each Rhasspy Base provides one or more services to the Satellite devices, and so needs only its communications and the modules being provided to be configured. In this tutorial one Rhasspy Base will provide all of the CPU-intensive modules.

In Rhasspy on the Base station (browse to port 12101 of your Base station e.g. http://homeassistant.local:12101 ):

  1. Select Settings from the menu, or by clicking the cog wheels on the left of the page.

  2. set MQTT to “External” and entered the hostname or IP address of the computer which is running the Mosquitto server (my base station) and the 1883 port number from the previous step.

  3. Set Speech to Text to “Kaldi”, and add your Satellite SiteIds:

  4. Intent Recognition to “Fsticuffs”, and add your Satellite SiteIds: at the bottom of the section.

  5. Text to Speech to “Larynx”, and add your Satellite SiteIds: at the bottom of the section.

  6. Dialogue Management to “Rhasspy”, and add your Satellite SiteIds.

  7. Audio Recording, Wake Word, Audio Playing and Intent Handling should all be set to “Disabled” on the base station.

Note that Satellite Ids are important ! MQTT may be handling messages from/to lots of other modules, so this tells Rhasspy Base which messages to listen to. A message with any other Satellite Id will be ignored.

We will come back to the Base station later, to setup the sentences, intents; and actions to be performed.

Part 2 - Setup Satellite

To make the most of the zero’s limited resources I want to avoid any unnecessary processing tasks, so I use Raspberry Pi OS Lite version (aka Rhasspy’s Debian install method).

Unfortunately I have not found a simple link to download the installation file direct to the - so we will download the latest versions of the programs we will be using to your main desktop computer, and then copy to your Satellite.

On your PC

  1. browse to Installation - Rhasspy, and click on “armel” in the line

armel - Raspberry Pi 0, 1

  1. Use raspberry Pi Imager or Etcher to copy theRaspberry Pi OS to the SD card.
    a. Download the Raspberry Pi Imager from Operating system images – Raspberry Pi
    b. Run Raspi-imager, select “Raspberry Pi OS Lite (32-bit)”; click [Storage] button and choose your SD card.
    c. Press to pop-up Advances options dialog box. Set hostname; enable SSH and set password for ‘pi’ user; configure Wi-Fi SSID, password and wifi country; and save.
    d. Click the [Write] button.
    Alternatively you can use the Etcher package.

  2. When the file has finished copying, copy the rhasspy_armel.deb file downloaded in step 1 from your PCs Downloads directory to the /home/pi/ directory on the rootfs partition of the microSD card.

  3. Eject the boot or rootfs partitions.

On your Satellite Raspberry Pi

This section seems quite long, but that’s because I have tried to make these instructions very detailed. In summary, what we’re doing is:
• Download and install RaspberryPi OS on the satellite machine - complicated because the satellite does not need to have a screen or keyboard connected.
• There’s no point giving verbal commands if Rhasspy can’t hear you. It is vitally important to get your microphone and speaker working before gong any further.
• Install Rhasspy and check that it is communicating with the Base station.
• HermesLEDControl flashes the lights on the reSpeaker board as a visual indication of its status.
• And finally get Rhasspy to start up automatically if the power ever goes off.

Lets get started:

  1. Place the microSD card in your RaspPI and turn the power on. Be patient because the first time it takes many minutes for the Zero to start.

  2. If you have HDMI attached you will see many messages scroll past and a reboot – this is normal. Watch out for the scrolling to stop with a “raspberrypi login:” message.

    If you have no monitor and keyboard connected, use the terminal program on your PC. Connect by SSH to the hostname or IP address of your Satellite machine. You may need to follow instructions at Raspberry Pi Documentation - Remote access

    Note that it can take several minutes for the first power on before the can accept SSH connections.

Install drivers and test

  1. Turn off wi-fi power saving to reduce drop-outs
    sudo iw dev wlan0 set power_save off

  2. Seeed stopped updating their driver a couple of years ago, so install HinTak’s updated reSpeaker driver

sudo apt install git
git clone https://github.com/Hintak/seeed-voicecard.git
cd seeed-voicecard
sudo ./install.sh

This will take several minutes, and may include reinstalling parts of the OS kernel. It will probably end with the instruction displayed to reboot the Satellite machine.

sudo reboot

  1. Test the microphone and speaker now. If the hardware isn’t working there is no point continuing ! Easiest way is to make a short recording and play it back…

arecord -f cd -Dhw:1 test.wav

say a few words, then press [Ctrl-C]. Now test with

aplay -Dhw:1 test.wav

  1. Check that speaker is plugged in and powered on (if appropriate). Note that it can be plugged into the 3.5mm socket on the , or connected to the reSpeaker HAT card.

  2. If this test doesn’t work, do “arecord -l” and “aplay -l”, and check whether there is a device number “1”. Device numbers can change with each reboot if you add or remove a device (eg a HDMI monitor that can play sound).
    Change device number as necessary and try again.

  3. We can adjust the audio parameters

alsamixer

  1. Press [F6] and change to the seeed sound card.
    Press [F5] to view both microphone and speaker controls (since reSpeaker 2-mic has both on the same card)
    use the keyboard arrow keys to alter every setting which shows in the red down to approx 60-70
    Press [Esc] to exit
    In you wish, you can go back to step 5) and test again.

  2. If none of these get the microphone and speaker working, stop now and seek help to get the hardware working.

  3. Test the LEDs

git clone https://github.com/respeaker/mic_hat.git
cd mic_hat
python3 interfaces/pixels.py

The three LEDS should turn on and perform a test pattern. Press [Ctrl-C] to stop the program.

  1. You can also test the button by

python3 interfaces/button.py

The program checks the button regularly and prints “on” if the button is pressed and “off” if the button is not pressed. Type [Ctrl-C] to stop the program.

Install Rhasspy

  1. *** temporary fix (refer Raspberry Pi OS "Bullseye" base does not install libffi6 needed by rhasspy precompiled packages. · Issue #259 · rhasspy/rhasspy · GitHub)

sudo apt-get install libffi6

  1. install Rhasspy,

cd ~
sudo apt install ./rhasspy_armel.deb

  1. configure and test. Note that the “–Profile en” indicates English language to be used, and should be changed to suit yourself, eg “fr” for French.

rhasspy --profile en

You should see a load of messages (most starting “DEBUG:”) until after a minute or so …

Running on 0.0.0.0:12101 over http (CTRL + C to quit)

From here on there will be an awful lot of messages coming up on the Satellite’s terminal – most starting “[DEBUG:”

On your PC

  1. Back on your desktop computer, open your web browser and visit http://<IP_ADDRESS>:12101 where <IP_ADDRESS> is the hostname or IP address of your Satellite . You should see the Rhasspy web interface.

  2. Either click on the cogs icon on the left of the screen or select “Settings” from the menu.

  3. Change the “siteId:” from default to something meaningful. Each satellite needs a unique siteID to allow the shared MQTT server to know where a request has come from, and hence where the result should be returned to.

  4. Next to the black [MQTT] button select “External”, then click on the [MQTT] button (which has now turned green) to display the MQTT options.

  5. In the Host field, enter the machine name or IP address of the Base system, and check that the Port number matches the MQTT port number set on the Base station.

  6. Click on the blue [Save Settings] button.

A window will pop-up confirming “Settings saved” and asking whether to “Restart Rhasspy ?” Click [OK] to each of these restart requests in this section.

  1. To get started, enable the following services and click “Save Settings”:
    • Audio Recording (arecord)
    • Wake Word (Porcupine)
    • Speech to Text (Hermes MQTT)
    • Intent Recognition (Hermes MQTT)
    • Text to Speech (Hermes MQTT)
    • Audio Playing (aplay)
    • Leave Dialogue Management Disabled – we do not need it on the satellite.
    • Intent Handling (Home Assistant)

  2. Click [Save Settings] and confirm to Restart Rhasspy.

  3. Click the green [Audio Recording] button to show the microphone controls.

  4. Click the grey [Test] button to get Rhasspy to test each device to guess whether it’s working or not.

Note the “(working!)” next to those options which Rasspy think are working.
Click the blue “Refresh” button; then choose the “hw:CARD=seed2micvoice”option from the Device drop-down list.

  1. For “port” enter 12203, and in the Output siteId, enter the SiteId value you entered at step 2 above.
    You can tick the “Audio Statistics” box to show values … which should change in real time as you speak.

  2. Click on the green [Wake Word] button to show the options, and in “UDP Audio (Input)” enter 12203.

  3. If you go down to the green [Audio Playing] button you should find that the drop-down list of Available Devices has also been populated. Select one, then click the blue [Save Settings] button and restart Rhasspy.

  4. click the blue [Save Settings] button and restart Rhasspy.

Test microphone and speaker

This is important – there’s no point proceeding until Rhasspy can hear and respond to us.

  1. Go back to the Home page (icon of a house on left of screen, or “Home” in the menu).
    Speak the word “porcupine”. Hopefully you will hear a chirp sound from the headphones or speaker to indicate that (a) the microphone has heard you, (b) the “Porcupine” Wake Word module has recognised its name, and (c) the speaker has played a sound.

    If you already have your Rhasspy Base fully configured (i.e. this isn’t your first Satellite), you can try giving Porcupine a command now. With luck you should see the command recognised. If so, you can proceed to the next section.

  2. Not the end if it didn’t all “just work”. See the appendix at the end of this document: Troubleshoot Rhasspy mic problems

Install HermesLedControl and test

Lets add visual feedback to a reSpeaker style HAT using HermesLEDcontrol. This is totally optional, so feel free to skip this section if you wish and/or come back to it later.

Ideally (on the Zero, because it is much slower to boot), we want to see:
(a) When Rhasspy is running (like turning on the Power LED)
(b) When wakeword is detected, and Rhasspy is listening
(c) Intent is NOT recognised
(a) Intent recognised (and being passed to Home Assistant to action)

On the Satellite Terminal…

  1. If rhasspy is still running, press to stop Rhasspy. Press key when you see the “Shutting down core” message.

  2. Download the automatic downloading tool. Do not use master ! Copy the following, and paste it as one line into your terminal:

wget https://gist.githubusercontent.com/Psychokiller1888/a9826f92c5a3c5d03f34d182fda1ce4c/raw/cbb53252dd55dc4e9f5f6064a493f0981cf133fb/hlc_download.sh

  1. enter the following commands:

sudo chmod +x hlc_download.sh
sudo ./hlc_download.sh

  1. You will be asked a series of questions. Accept the default paths, choose the relevant multi-choice options. Choose any pattern (we can change later). Do NOT enable DoA.
What assistant engine are you using?              2) rhasspy

What's the path to your assistant config file?
Path: (/.config/rhasspy/profiles/en/profile.json)

What device do you wish to control with SLC?       2) respeaker42icArray

What pattern do you want to use?                   1) google

Where should the configuration be saved to?
Path: /home/don/.config/hermesLedControl

Do you want to enable DoA now?                     2) no
  1. Run the file editor (called nano)

sudo nano /home/pi/hermesLedControl_v2.0.15/models/LedPattern.py

add “import logging” near the top of the file, then press [CTRL]-X.
when asked if you want to “Save modified buffer ?”, reply ‘y’.

  1. start HermesLEDcontrol running

sudo systemctl daemon-reload
sudo systemctl enable hermesledcontrol

  1. The latest OS comes with python 3.9, so another work-around is required. Other tutorials are required to follow.
    Rhasspy Assistant Tips n Tricks | Jeedom by KiboOst

Run Rhasspy as a service

One last thing to do – though you could skip it now to check out your Voice Assistant, then come back to this later.

When the power goes off (or we reboot the Satellite) we will have to manually re-connect to the satellite through SSH and re-start rhasspy. Instead we can run Rhasspy as a service so it happens automatically.

There is however, an issue with running as a service – because linux is a multi-user system there could in theory be other users logged in, and so rhasspy’s shutdown and restart operations require us to enter our sudo password at the terminal … however we don’t have a console attached and so the satellite cannot shutdown cleanly.

  1. Given that this is a dedicated voice assistant satellite and not connected to the internet, I have opted to do the bad thing by authorising the user “pi” to have root privileges, so that the sudo password will not be required.

sudo visudo

at end of the file, paste

pi ALL = NOPASSWD: ALL

Save the file by pressing [CTRL]-X and “y”

  1. Setup the service, by

sudo nano /etc/systemd/system/rhasspy.service

Copy and paste the following into the file

[Unit]
Description=Rhasspy Autostart
After=network-online.target
 
[Service]
Type=simple
User=pi
WorkingDirectory=/home/pi
ExecStart=/bin/bash -lc '/usr/bin/rhasspy --profile en 2>&1 | cat'
StandardOutput=syslog
StandardError=syslog
SyslogIdentifier=rhasspy
Restart=on-failure
RestartSec=30
 
[Install]
WantedBy=multi-user.target

Save the file by pressing [CTRL]-X and “y”

  1. Start the service
sudo systemctl enable rhasspy
sudo systemctl daemon-reload
sudo systemctl start rhasspy

If you have problems with this, or want additional information, see the appendix “Troubleshoot: Rhasspy as a service”.

Part 3 - Set up Rhasspy as Voice Assistant

By now you should have:
• Rhasspy installed as a Base station (with Home Assistant and MQTT)
• Rhasspy installed as a satellite
• both installed with External MQTT
• have tested that words spoken at the satellite are recognised (converted to text)

Before we get stuck in, there are a few more points which might help
• Probably the key term is “intent” - which is the command you want performed (eg your intention is to “turn on the light”).
• The sentences.ini file in Rhasspy on the base station defines the syntax of the voice commands you will give (what words and in what order). It identifies the name of the intent and any tags (parameters). Some of the words are optional, and some have alternatives.
• Rhasspy is modular, allowing you to choose different modules for each of the seven stages (see the “Voice Assistant / Rhasspy” section back in the Overview).
• Since the Base machine will be doing the intent recognition for all the satellites, we only have one place to maintain the sentences.
• Rhasspy will send Home Assistant a small text file containing the intent and parameters. In Home Assistant’s configuration.yaml you add the matching intent name and the instructions to be performed.
• Voice recognition isn’t 100% perfect, especially when there is background noise. The result might really be “I’m 85% sure you said ‘Turn on the kitchen light’” – and sometimes Rhasspy is only 30% sure, leading to some amusing or annoying results.
• for this tutorial I have selected Fsticuffs for [Intent Recognition] in Rhasspy on the Base station. Fsticuffs will recognize only those sentences that Rhasspy was trained on, and is documented at http://homeassistant.local:12101/docs/intent-recognition/#fsticuffs. Other modules are available, which will work differently.

Telling Rhasspy what commands to expect

  1. First step is telling Rhasspy what sentences to expect (i.e. what commands you want to give). For this, in Rhasspy on the Base station machine, select “Sentences” (the button on left side with 4 horizontal lines). You will see some initial default sentences or some built-in intents (commands):

The default sentences should be enough to get you started, but soon you will want to come back to customise your own … with your own device names. I have included the explanation here, and you should come back to it as often as you want as you add new commands and customise your Voice Assistant.

Intent

Each intent is indicated by the square brackets starting in column 1 (e.g. [GetTime]).

It is followed by one or more voice commands that you might say. For instance, to command Rhasspy to say the time you might say “What time is it” or “Tell me the time”.

The intent name is sent to Home Assistant to tell it which command to perform.

Groups

You can group multiple words together using (parentheses) like:

turn on the (living room lamp)

Groups (sometimes called sequences) can be tagged and substituted like single words. They may also contain alternatives.

Alternatives

A set of items where only one is matched at a time is (specified | like | this). For example, GetTemperature will match “how hot is it” or “how cold is it”.

Optional words

Within a sentence template, you can specify optional word(s) by surrounding them [with brackets]. For example:

[an] example sentence [with] some optional words

will match:
• an example sentence with some optional words
• example sentence with some optional words
• an example sentence some optional words
• example sentence some optional words

Tags / Entities

Named entities are marked in your sentence templates with {tags}. The name of the {entity} is between the curly braces, while the (value of the){entity} comes immediately before:

[SetLightColor]
set the light to (red | green | blue){color}

Speaking “set the light to blue” will pass to Home Assistant the intent name [SetLightColour] with the entity {color} containing the value “blue”.
A more complex example would be:

[ChangeLightState]
light_name = (living room light | study light | bedroom light) {name}
light_state = (on | off) {state}

turn <light_state> [the] <light_name>
turn [the] <light_name> <light_state>

Speaking “turn on the bedroom light” will display on the Rhasspy Home screen of both the satellite and base station:

Rhasspy determines that the “ChangeLightState” intent is to be called with slot “name” having a value of “bedroom light” and slot “value” having a value of “on”.
image

  1. Make any changes, then click the [Save sentences] button (which is now red to indicate that changes have been made). A pop-up window will confirm that changes were saved, and ask if you wish to Retrain Rhasspy? Press the [OK] button to start Rhasspy updating its internal tables used to recognise the intents (sentences). This could take several minutes depending on CPU speed and lengths and complexity of your sentences.

Important: Every time you make changes to the sentences.ini you will have to [Save Sentences] and retrain Rhasspy before you can test the change. Yes this gets a bit tedious – but nowhere near as bad as having to make the same change on each Satellite.

This is enough to get you started; I recommend that later you check out the Training section in the Rhasspy documentation at Training - Rhasspy

Getting the Intents from the Satellite to Host

Having defined what our intents are, we need to get them from the Rhasspy satellite machine to Home Assistant. There are three methods we could use here, but for this tutorial I am sending intents.

You may also need to use a Long-lived Access Token; so lets create one which will identify Rhasspy-related communications to Home Assistant.

In Home Assistant

  1. In Home Assistant, go to your profile page by clicking the button in the bottom left corner.
    It probably displays the first letter of your username or a picture, and will display the name of the current user when your mouse is over it.

  2. Go to the very bottom of the Profile page (as shown here), and click [Create Token]

  3. Give it a name (I called mine “Rhasspy”)

  4. A window will pop up displaying an extremely long sequence of characters (well beyond the left and right sides of the window) will be shown. You need to copy this entire sequence now.
    image

  5. Click your mouse anywhere in the line of code, press the [Home] key to move the cursor to the start of the code, press [Shift-End] to highlight to the end of the code, and [Ctrl-C] to copy the code to clipboard.

On your Satellite

  1. In Rhasspy Settings on the Satellite, set [Intent Handling] to “Home Assistant”, and click [Save settings]. Whena asked to Restart Rhasspy, click [OK]
  2. Go back to Settings and click on the green [Intent Handling] button to open the settings.
  3. add the URL for Home Assistant – the “http://” protocol, hostname or IP address of the Home Assistant machine, and port number :8123.
  4. Paste that long code from step 5 above into the “Access Token” field
  5. We are using intents in Home Assistant, so select the “send intents”… option.
  6. click [Save Settings].

Action the intents within Home Assistant

We are nearly there ! Now that we have sent the intent to Home Assistant, we need to tell Home Assistant how to action it.

  1. Start the File Editor by clicking on the spanner icon in the sidebar. If you didn’t previously add it to the sidebar you will have to go to the File Editor Add-on and click the [Open web UI] link to start it.
  2. The File editor defaults to opening configuration.yaml, which happens to be the file we want. Add these lines to the file:
intent: 
intent_script: !include intents.yaml

Note that the keywords “intent:” and “intent_script:” are required. I have chosen to place the actual intents in a separate file to make them easier to edit; but you can simply list the intents directly after “intent_script:”.

  1. Save your change by clicking the red floppy disk “Save” icon

  2. To create a new “intents.yaml” file, click the “Browse Filesystem” folder icon (at left of the blue toolbar), and a list of files in the config folder will open.

  3. Click the “New File” icon on the left and you will be asked for “New File Name”. Enter intents.yaml and click [OK]

image

  1. Scroll down the list of files and click on “intents.yaml” to open it in the File editor, then click on the right side of the screen which is currently greyed out.
  2. Copy the following and paste (using CTRL-V) the following into the intents.yaml file.
#
# intents.yaml - the actions to be performed by Rhasspy voice commands
#

GetTime:
  speech:
    text: The current time is {{ now().strftime("%H %M") }}

LightState:
  speech:
    text: Turning {{ name }} {{state }}
  action:
    - service: light.turn_{{ state }}
      target:
        entity_id: light.{{ name | replace(" ","_") }}
  1. Don’t forget to save the file.

And that’s it ! When the words “Porcupine, turn on the study light” are spoken, Rhasspy determines that the “LightState” intent is to be called with slot “name” having a value of “study light” and slot “value” having a value of “on” … as seen in the first image above.

This intent is passed (in a JSON file) to Home Assistant, where the intent name is looked up in the configuration.yaml (or intents.yaml) file.

Intent name “LightState” matches with “LightState:” in the intents.yaml file, and {name} and [state} parameters are substituted, so that Home Assistant actually runs the automation:

LightState:
  speech:
    text: Turning study light on
  action:
    - service: light.turn_on
      target:
        entity_id: light.study_light
1 Like

Part 4 - Next steps & Troubleshooting

Having got it running, make a backup. Make two – a backup of your configuration, but also copy the microSD card onto another microSD card. Yes. Memory cards don’t have moving parts, but they do still go faulty over time. If your satellite starts playing up (especially if you haven’t changed anything at the base station), simply swap microSD cards and check if the problem is resolved.

WARNING: every update of Operating System kernel can break respeaker drivers. For best user experience I would suggest avoiding updating the Satellite systems until there is a significant reason to do so.

Because it is hard to predict what problems you might encounter I have not put as much effort into handling them in detail - sorry. If these notes don’t help, please go to the Rhasspy Forum and search for keywords you think describe your problem. if you can’t find an existing discussion (or it doesn’t suggest a solution) please start a new Topic and describe the configuration you have and your problem. Try to be fairly detailed because, well, we’re not mind readers, and there are lots of possible configurations.

Change HLC patterns

It is fairly easy to try different light patterns using HLC, and I concider this much more a feature of the reSpeaker 4-mic HAT (which has 12 LEDS) over the 2-mic HAT with only 3 LEDs next to each other.

HLC debugging
Start the service: sudo systemctl start hermesledcontrol
Stop the service: sudo systemctl stop hermesledcontrol
Restart the service: sudo systemctl restart hermesledcontrol
Show service log: journalctl -u hermesledcontrol.service

You can change the pattern by stopping the service, editing and starting the service

sudo nano /etc/systemd/system/hermesledcontrol.service

ExecStart=/home/pi/hermesLedControl_v2.0.3/venv/bin/python3 main.py --engine=rhasspy --pathToConfig=/home/pi/.config/rhasspy/profiles/fr/profile.json --hardware=respeaker2 --pattern=kiboost

Troubleshoot: Rhasspy mic problems

If you didn’t test that the microphone and speaker were working correctly back at step 5), go back and do it now because if the hardware isn’t working there is no way that software can fix it.

Now we test speaker and microphone separately.

  1. Click the yellow [Wake Up] button to start Rhasspy recording a possible command.

    You should hear a chirp from the speaker or headphones, and see a pop-up telling you that Rhasspy is “Listening for Command”. The chirp indicates the Audio Playing device is working.
    image

  2. You can also test the speaker by typing a phrase onto the text box next to the [Speak] button, then clicking [Speak].

  3. If you don’t hear anything, go back to step 20) and select a different Audio Playing device.

    a) Try swapping between the “hw:” and “plughw:” versions. try choosing a specific device instead of using the default (make sure to “Save Settings”).

    b) Check that devices are still correct. Note that connecting or disconnecting an HDMI monitor can change the speaker device numbering. Clicking the blue “Refresh” button will query PyAudio again for this list. The “Test” button next to “Refresh” will attempt to record audio from each device and guess if it’s working or not. The text “working!” will show up next to working microphones in the list.

  4. Testing the microphone is not so obvious. To test the mic, just click [Wake Up] and talk into the microphone. Even if no intent is recognised, the play button next to the wake up button should play it, and if the speakers don’t work, you can always use the [Upload WAV File] button and play it on your PC.

  5. Mic testing via audio input statistics: If you are not interested in how the mic sounds and just want to know if it works at all, there is an audio statistic button in the audio recording section of the settings. Just activate and look if it will turn out numbers, if so, it has some kind of sound, it might be just noise thought. If you speak or otherwise make sounds near the mic the numbers should reflect that, if they do, your mic is recording your environment. It might do so perfectly clear, or with lots of noise, this is not the way to tell but that is what the main gui is for.

After the chirp, the microphone listens until it hears 30 seconds of silence (assuming you have stopped talking).

Problems fall into several main categories:

A. speaker not working.

  • Most easily checked from OS by using arecord and aplay, and checking alsamixer settings.

  • This is easily checked on the satellite’s web page by entering some text and clicking the [Speak] button.
    image

  • Check that speaker is plugged in and powered on (if appropriate).

  • Check that devices are still correct. Note that connecting or disconnecting an HDMI monitor can change the speaker device numbering.

  • Try changing between the hw: and plughw: devices ???

B. wakeword not recognised. When you speak the wakeword, no beep is heard.

  • Try again in a minute. If using a Raspberry Pi Zero, make that 3-5 minutes.
  • words not recognised is province of the “Speech to Text” settings. This can be performed on the satellite, or passed by MQTT or remote HTTP to a another instance of Rhasspy
  • Check the syntax of the Sentences.ini file (via the Rhasspy Sentences menu option)

Troubleshoot: Rhasspy as a service

To check for errors (display end of the log for the rhasspy.service):

journalctl -e -u rhasspy.service

Linux system services handle stdout differently from command line. If we had used “ExecStart=rhasspy --profile en” above, we would have got “spawnerr: unknown error making dispatchers for ‘microphone’: ENXIO” error. See [Sherlock - Offline Voice Assistant project](https://ip-team4.intia.de/pages/knowledge/systemd.html) for a description

And, so far, this seems to be working for me.

An alternative /lib/systemd/system/rhasspy.service file is:

       [Unit]
       Description=Rhasspy Service
       After=syslog.target network.target
       
       [Service]
       Type=simple
       ExecStart=/bin/bash -c '/usr/bin/rhasspy --profile fr 2>&1 | cat'
       RestartSec=1
       Restart=on-failure
       StandardOutput=syslog
       StandardError=syslog
       SyslogIdentifier=rhasspy
       
       [Install]
       WantedBy=multi-user.target

From Rhasspy as a service (without Docker) - #2 by donburch

Running any service with root privileges is not recommended, so here’s my rhasspy.service used on a headless debian (x64) machine:

           [Unit]
           Description=Rhasspy Service
           After=syslog.target network.target mosquitto.service
           
           [Service]
           Type=simple
           # for command, see https://github.com/rhasspy/rhasspy/issues/42#issuecomment-711472505
           ExecStart=/bin/bash -c 'rhasspy -p de --user-profiles /opt/rhasspy/profiles 2>&1 | cat'
           WorkingDirectory=/opt/rhasspy
           User=rhasspy
           Group=audio
           RestartSec=10
           Restart=on-failure
           StandardOutput=syslog
           StandardError=syslog
           SyslogIdentifier=rhasspy
           
           [Install]
           WantedBy=multi-user.target

User rhasspy and working dir have to be added manually, obviously, and user rhasspy is added in group audio (despite the fact no direct audio hardware is used).
Suggestions to improve it are welcome, as this also is some kind of copy/paste solution…

Troubleshoot: Logs and places to check:

On the Satellite:

  • Console log (if running rhasspy from the command line)
  • From the Rhasspy web page, click on the grey [Log] button on the black line at top of the web page. Note that this has latest entry at the top – and is only a small subset of the console messages.

On the Base station:
If Home Assistant is not actioning the intent.

  • Home Assistant Config Logs shows Home Assistant errors. The full log at the bottom may provide more detail.
1 Like

There is always something that has confused me with at least the docker version when selecting input and output.

If I exec into the rhasspy container install and run

root@d9ed5838901b:/var/cache/apt/arm64# python3 -m sounddevice
  0 seeed-2mic-voicecard: bcm2835-i2s-wm8960-hifi wm8960-hifi-0 (hw:2,0), ALSA (0 in, 2 out)
  1 Loopback: PCM (hw:3,0), ALSA (32 in, 32 out)
  2 Loopback: PCM (hw:3,1), ALSA (32 in, 32 out)
  3 playback, ALSA (0 in, 128 out)
  4 capture, ALSA (128 in, 0 out)
  5 dmixed, ALSA (0 in, 2 out)
  6 array, ALSA (2 in, 0 out)
* 7 default, ALSA (128 in, 128 out)

Where does Rhasspy get that bewildering array of devices from? When actually the list should be quite simple.
It even calls devices pulseaudio devices but pulseaudio is not running or installed?
My list would even be simpler if I had not modprobed the asndloop driver and (1 2) would also not be there.
It picks up as it should off the /etc/asound.conf I have

# The IPC key of dmix or dsnoop plugin must be unique
# If 555555 or 666666 is used by other processes, use another one


# use samplerate to resample as speexdsp resample is bad
defaults.pcm.rate_converter "samplerate"

pcm.!default {
    type asym
    playback.pcm "playback"
    capture.pcm "capture"
}

pcm.playback {
    type plug
    slave.pcm "dmixed"
}

pcm.capture {
    type plug
    slave.pcm "array"
}

pcm.dmixed {
    type dmix
    slave.pcm "hw:seeed2micvoicec"
    ipc_key 555555
    ipc_perm 0666
}

pcm.array {
    type dsnoop
    slave {
        pcm "hw:seeed2micvoicec"
        channels 2
    }
    ipc_key 666666
    ipc_perm 0666
}

pcm.mono {
 type plug
 slave {
   pcm "array"
   channels 2
   }
 route_policy sum
}

I copied one that also sums into mono as that sets a static beamformer (pcm.mono) as if you where central but if you record x2 samples one straight on and 90’ to the mics you should be able to hear the effect that will have. (edit so the default capture.pcm "mono")

Also in the tutorial you recommend picking the plughw:device which is ok as it will get autoconversion but without dmixed or dsnoop (someone will explain to me one day why dsnoop as a name as haven’t a clue) you have blocking single use of the device, but with those will allow concurrent uses of sinks/sources.
If you just add /etc/asound.conf:/etc/asound.conf to the docker run and its set out like the above your ready and set to just use the default as is on the host as long as you also add --ipc=host.

And that is why I chose not to use Docker for my satellites.
I started by following the all-on-one tutorial in the documentaion, but my reSpeaker HAT required a driver to be installed in the Docker container. Rather than add the learning curve for Docker (to my already confused brain), I simply decided that Base+Satellite made more sense in the long term anyway … and I couldn’t see any benefit to adding extra overhead of Docker on a Satellite machine that was only ever going to run one app.

That sounds like good information for anyone who goes the Docker install path for their Satellite, thanks.

No you only need to install on the host as have been playing of late to refresh my bad memory.

Docker isn’t virtualization, as such – instead, it’s an abstraction on top of the kernel’s support for different process namespaces, device namespaces, etc.; one namespace isn’t inherently more expensive or inefficient than another, so what actually makes Docker have a performance impact is a matter of what’s actually in those namespaces.
Or more simply run-time cost being close to zero apart from what its running. Its a fancy chroot really.

Guess its just preference but my memory initially sent me the wrong way and you only need drivers on the host but you do need to share a asound.conf or have one with the ipc set.

I am still confused at all the devices rhasspy seems to get though when the list should be really small unless your running a desktop or have installed pulseaudio/pipewire. Either way likely setup or use the driver installed /etc/asound.conf and just keep to default.

PS for many reasons a simple few $ usb soundcard and a couple of $ microphone is better and doesn’t even need a driver but prob setup a /etc/sound.conf using the above as a template.
I try to be enthusiastic but the respeaker 2mic/4mic are a fraction away from ewaste for actual use for many reasons.
If you picked up the 4mic for the pixel ring they are extremely cheap on ebay and just google ws2812b pi driver as far more flexible to install and place when not on a hat as well.

If you are a “normal” user it seems very promising to get a device with mic, driver and hermesledcontrol, which also seems to have AEC.

Great tutorial, thanks for sharing!

I’ve tried following it using aRPi Zero W with an IQaudIO Codec Zero HAT and replacing the driver installation bit with this part from the RPi official documentation, but something’s off.

Although I can arecord -f cd test.wav and Rhasspy sees the IQaudio card and capture device, I get a timeout error when I activate the wake word by hand.

[DEBUG:2023-01-20 10:28:36,474] rhasspyserver_hermes: -> HotwordDetected(model_id='default', model_version='', model_type='personal', current_sensitivity=1.0, site_id='rhasspy-sat1', session_id=None, send_audio_captured=None, lang=None, custom_entities=None)
[DEBUG:2023-01-20 10:28:36,480] rhasspyserver_hermes: Publishing 204 bytes(s) to hermes/hotword/default/detected
[DEBUG:2023-01-20 10:28:36,488] rhasspyserver_hermes: Waiting for intent (session_id=None)
[DEBUG:2023-01-20 10:28:36,496] rhasspyserver_hermes: Subscribed to hermes/error/nlu
[DEBUG:2023-01-20 10:28:36,551] rhasspywake_porcupine_hermes: <- HotwordToggleOff(site_id='rhasspy-sat1', reason=<HotwordToggleReason.PLAY_AUDIO: 'playAudio'>)
[DEBUG:2023-01-20 10:28:36,558] rhasspywake_porcupine_hermes: Disabled
[DEBUG:2023-01-20 10:28:36,582] rhasspyspeakers_cli_hermes: <- AudioPlayBytes(83948 byte(s))
[DEBUG:2023-01-20 10:28:36,597] rhasspyspeakers_cli_hermes: ['aplay', '-q', '-t', 'wav', '-D', 'plughw:CARD=IQaudIOCODEC,DEV=0']
[DEBUG:2023-01-20 10:28:36,593] rhasspyserver_hermes: <- HotwordDetected(model_id='default', model_version='', model_type='personal', current_sensitivity=1.0, site_id='rhasspy-sat1', session_id=None, send_audio_captured=None, lang=None, custom_entities=None)
[WARNING:2023-01-20 10:28:36,629] rhasspyserver_hermes: Dialogue management is disabled. ASR will NOT be automatically enabled.
[DEBUG:2023-01-20 10:28:37,724] rhasspywake_porcupine_hermes: <- HotwordToggleOn(site_id='rhasspy-sat1', reason=<HotwordToggleReason.PLAY_AUDIO: 'playAudio'>)
[DEBUG:2023-01-20 10:28:37,734] rhasspywake_porcupine_hermes: Enabled
[DEBUG:2023-01-20 10:28:37,763] rhasspywake_porcupine_hermes: <- HotwordToggleOff(site_id='rhasspy-sat1', reason=<HotwordToggleReason.DIALOGUE_SESSION: 'dialogueSession'>)
[DEBUG:2023-01-20 10:28:37,772] rhasspywake_porcupine_hermes: Disabled
[DEBUG:2023-01-20 10:28:38,381] rhasspyspeakers_cli_hermes: -> AudioPlayFinished(id='50937551-62de-45c4-9e12-9f0ca8b83098', session_id='50937551-62de-45c4-9e12-9f0ca8b83098')
[DEBUG:2023-01-20 10:28:38,387] rhasspyspeakers_cli_hermes: Publishing 99 bytes(s) to hermes/audioServer/rhasspy-sat1/playFinished
[ERROR:2023-01-20 10:29:06,544] rhasspyserver_hermes:
Traceback (most recent call last):
  File "/usr/lib/rhasspy/usr/local/lib/python3.7/site-packages/quart/app.py", line 1821, in full_dispatch_request
    result = await self.dispatch_request(request_context)
  File "/usr/lib/rhasspy/usr/local/lib/python3.7/site-packages/quart/app.py", line 1869, in dispatch_request
    return await handler(**request_.view_args)
  File "/usr/lib/rhasspy/rhasspy-server-hermes/rhasspyserver_hermes/__main__.py", line 943, in api_listen_for_command
    async for response in core.publish_wait(handle_intent(), [], message_types):
  File "/usr/lib/rhasspy/rhasspy-server-hermes/rhasspyserver_hermes/__init__.py", line 995, in publish_wait
    result_awaitable, timeout=timeout_seconds
  File "/usr/lib/rhasspy/usr/local/lib/python3.7/asyncio/tasks.py", line 449, in wait_for
    raise futures.TimeoutError()
concurrent.futures._base.TimeoutError
[DEBUG:2023-01-20 10:29:07,752] rhasspywake_porcupine_hermes: <- HotwordToggleOn(site_id='rhasspy-sat1', reason=<HotwordToggleReason.DIALOGUE_SESSION: 'dialogueSession'>)
[DEBUG:2023-01-20 10:29:07,761] rhasspywake_porcupine_hermes: Enabled

All of the references that I’ve found on the matter while searching are either unanswered or left as “I’ve activated all of the Rhasspy services and it worked”, i.e. all-in-one, as opposed to base+satellite(s) config. Any pointers on further debugging?

I use Rhasspy version 2.5.11.

LATER EDIT: it started working all on its own. I suspect that the issue was either a service not starting up (yet) on the satellite, or a lack of training on the base, but I have no idea what actually happened.

I have noticed a “concurrent.futures._base.TimeoutError” trace even when Rhasspy is working correctly, so that might not be the problem.

Probably as the Rpi0W is extremely constrained performance wise and likely much is still playing catch up.

arecord

Thats the load without rhasspy installed recording a single channel on a respeaker 2mic on a fresh install of just the respeaker driver.
25% load just to record the needed audio stream alone.

arecord2

Likely you can do your self a favor if running the the respeaker /etc/asound.conf and remark out #defaults.pcm.rate_converter "samplerate" and use the default speex resampler than the high quality audiophile resampler, which at least will drop you to 10%. If that resampler is in use.

But yeah the zero needs a considerable time to catch up and really is under powered.

I don’t use respeaker, I use an IQaudO Codec Zero, but I get the point. Basically, I just have to wait for the thing to start up properly (and slowly) before any expectations for it to work, despite it not giving any hint that it needs more time. :sweat_smile:

Yeah, the RasPi Zero does take a few minutes to get going, prompting me to think that it needed some feedback to indicate that it is ready - say by hermesLEDcontrol flashing a particular pattern.

But I have found that once through the setup and testing phase it wasn’t so much of an issue because once started it only needs rebooting very infrequently.

And yes, the RasPi Zero is noticably slower than my RasPi 3A+ … but I already had one, and it does work well enough for me.

@tetele I am pleased that you have IQaudio running. I thought the specs looked reasonable, but was put off by the focus in documentation etc being on audio output - and me knowing practically nothing about linux audio in case I had to figure out any problem by myself.

It’s pretty simple to set up, to be honest, especially since it has built-in drivers in the HAT’s EEPROM.

The main disadvantage (apart from a single built-in microphone) is that it doesn’t have an out of the box audio jack, so you have to either solder one to the Line Out header or wire a speaker directly to the dedicated 2-pin screw terminal, then apply the according config from the Github repo.

1 Like

Yeah I have an Iqaudio also and it is a bit weird 1mic + 1 ADC, 1.2 watt speaker output and a solder on Aux output.
I have to admit it the Respeaker for price and function is prob best as $10 for a hat.
I also have the adafruit bonnet which is very much the same as the respeaker but $30, maybe a touch better quality with a better layout of LEDs but IMO its not worth the $20 difference.
The Keyes studio clones are pure noisey dirt and suggest anyone stay clear of them.

I’ve been trying this to build a Rpi3A+ satelite but I run into all kind of errors. According to the rhasspy documentation a rpi3+ should be enough, but I get kernel mismatch errors and the following:

It is a arm64 system so i changed the armel accordingly

The following packages have unmet dependencies:
rhasspy : Depends: libgfortran4 but it is not installable
Recommends: espeak
Recommends: flite but it is not going to be installed
Recommends: mosquitto but it is not going to be installed

I could install the mosquitto dep but libgfortran4, espeak and flite won’t work. There is no documentation about this. Any thoughts?

From a Google as dunno as tend to use the docker install