I have Raspeaker Core 2.0 and faced a lot of problems. There is documentation for ReSpeaker Core v2.0, but it does not write how to install Rhasspy 2.5.11, and the image for ReSpeaker Core v2.0 is outdated and not suitable for Rhasspy 2.5.11, since Rhasspy 2.5.11 is not installed on Debian 9. I spent a lot of time and figured out how to install Rhasspy 2.5.11 on ReSpeaker Core v2.0. Below will be the current instruction for 03/20/2023 and in the future this instruction may no longer be relevant.
Install Debian 9 on the SD card, not on emmc. Why is that? Because there’s not enough space. emmc with 4 GB of space is not enough to deploy Rhasspy. Out of 4 GB of free space, 200-400 MB of space will remain, which is critically small.
We use this image `raspeaker-debian-9-iof-sd-201801-4gb.img.xz’ and you can download it here
We put it according to this instruction, the article is relevant
Image Installation
Similar to the Raspberry Pi, you need to install the ReSpeaker Core v2.0 image from an SD card to get up and running. We offer two ways to boot the Respeaker core v2.0. You can either boot from the SD card or boot from the eMMC.
A. Boot from the SD card
-
Step 1. Click the mirror-azure to download our latest image zip files:
respeaker-debian-9-lxqt-sd-********-4gb.img.xzorrespeaker-debian-9-iot-sd-********-4gb.img.xz.
| Section | Description |
|---|---|
| iot / lxqt | The lxqt version comes with a desktop GUI while the iot version does not. If you are new to ReSpeaker Core v2.0, lxqt version is recommended. |
| flasher / sd | The flasher version is used to flash the onboard eMMC, after flashing you can remove the SD card. The sd version will require the SD card to stay inserted all the time. |
For development, we recommend the lxqt + sd version. So please download the respeaker-debian-9-lxqt-sd-[date]-4gb.img.xz file.
CAUTION
This wiki is based on the respeaker-debian-9-lxqt-sd-20180610-4gb.img.xz image version.
- Step 2. Plug the SD card into your PC or MAC with an SD card reader. You need an SD card with a capacity of more than 4G.
-
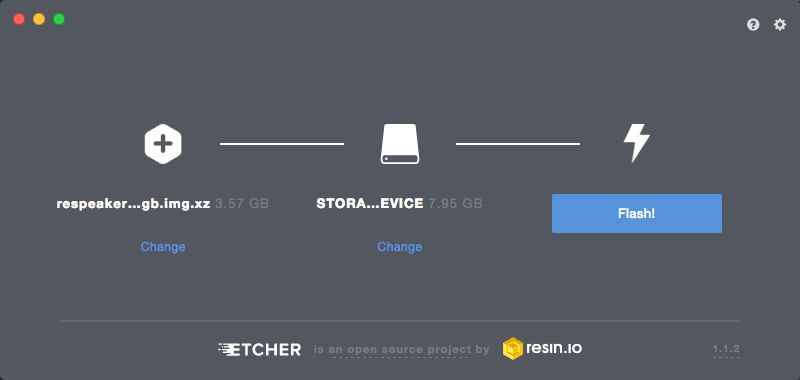
Step 3. Click to download Etcherhere, and burn the
*.img.xzfile directly to your SD card with Etcher. Or unzip the*.img.xzfile to a*.imgfile, then burn it to SD card with other image writing tools.
Click the Plus icon to add the image you just download, the software will automatically select the SD card you plug.Then click Flash! to start burning. It will take about 10 minutes to finish.
- Step 4. After writing the image to the SD card, insert the SD card in your ReSpeaker Core v2.0. Power the board using the PWR_IN micro usb port and DO NOT remove the SD card after powering on. ReSpeaker Core v2.0 will boot from the SD card, and you can see USER1 and USER2 LEDs light up. USER1 is typically configured at boot to blink in a heartbeat pattern and USER2 is typically configured at boot to light during SD card accesses. Now, you should go to the next part: Serial Console.
After successfully running Debian 9.5 on Raspeaker Core v2.0, we need to expand the root partition if we use an SD card larger than 4 GB. It is necessary to do this, since by default we are given 4 GB of space, and my SD card has a capacity of 32 GB, and I am allocated 4 GB, which is critically small and it needs to be fixed.
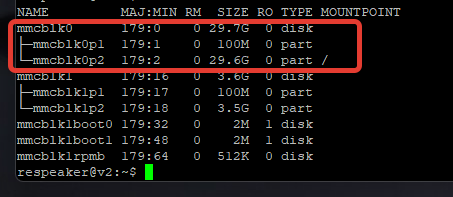
Output a list of block devices connected to the operating system
lsblk
We find our boot partition, it looks like this

Knowing that the size is incorrect and it should be larger than it is, then you need to change the size. Change the size
sudo cfdisk /dev/mmcblk0
Select our disk of the desired size and exit
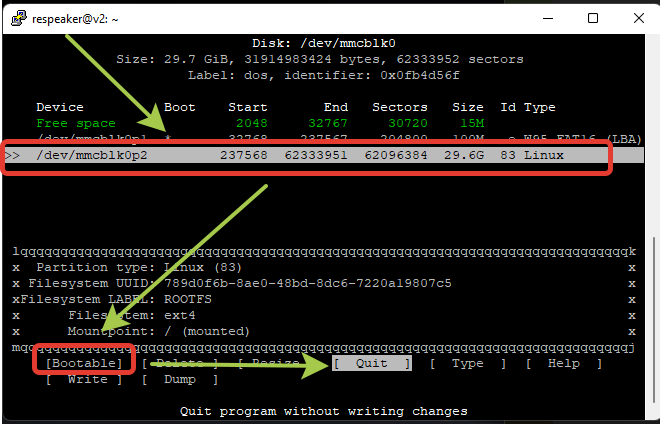
The output should turn out like this
If desired, you can change the credentials. Default credentials, after installing the image
Логин: respeaker
Пароль: respeaker
Change your password to your own
sudo su
passwd respeaker
Now we need to upgrade Debian from version 9 to Debian version 10. This is necessary in order to run Rhasspy 2.5.11. The process is long, so we are gaining patience. Be sure to use the current settings when updating and select N everywhere
Let’s check the current Debian version
lsb_release -a
Let’s update all the packages available for updating from the Stretch repositories
apt-get update
apt-get upgrade
Connecting Debian 10 repositories and updating packages
Deleting old repositories for Debian 9 and adding repositories for Debian 10
echo -n > /etc/apt/sources.list
nano /etc/apt/sources.list
Adding repositories for Debian 10
deb http://deb.debian.org/debian buster main contrib non-free
deb http://deb.debian.org/debian buster-updates main contrib non-free
deb http://deb.debian.org/debian-security buster/updates main contrib non-free
deb http://deb.debian.org/debian buster-backports main contrib non-free
Update the cache of the package manager and perform the initial package update
apt-get update
apt-get upgrade
Updating the system to Debian 10
apt-get dist-upgrade
After the installation of the entire package database of the new version is successfully completed, we delete the outdated files of unused packages
apt-get autoremove
Checking the OS version, there should be a Debian 10 version
lsb_release -a
Reloading
sudo reboot
After installing Debian 10, our microphone and speakers will not work. In order for this to work, you need to install the drivers for the seeed-8 mic-voice card to work. Documentation about seeed-voicecard
git clone https://github.com/respeaker/seeed-voicecard
cd seeed-voicecard
sudo ./ubuntu-prerequisite.sh
sudo reboot
Installing Rhasspy Voice Assistant on Debian 10
cd
wget https://github.com/rhasspy/rhasspy/releases/download/v2.5.11/rhasspy_armhf.deb
sudo apt install ~/rhasspy_armhf.deb
After installation, we will make a simple configuration of the mosquito
sudo nano /etc/mosquitto/conf.d/mosquitto.conf
Adding to mosquito.conf
listener 1883
allow_anonymous true
Launching the mosquito
sudo systemctl is-enabled mosquitto
Checking the status
sudo systemctl status mosquitto
Trial run
PATH="$PATH:/usr/sbin" rhasspy --profile ru
If you run rhasspy --profile ru, you will receive a message about the inability to connect to mqt
If the launch was successful, then you need to add it to autorun. Create a service to run rhasspy
Let’s create a service file rhasspy.service
nano /etc/systemd/system/rhasspy.service
Add an entry
[Unit]
Description=Rhasspy Service
After=network-online.target

[Service]
Type=simple
User=respeaker
Group=respeaker
WorkingDirectory=/home/respeaker/.config/rhasspy/
ExecStart=/bin/bash -lc '/usr/bin/rhasspy --profile ru 2>&1 | cat'

StandardOutput=syslog
StandardError=syslog
SyslogIdentifier=rhasspy
Restart=on-failure
RestartSec=30

[Install]
WantedBy=multi-user.target
Before starting the service, you must run with raspeaker rights. If you are under root, then we need to log out from under root by simply typing exit. Strictly run the command from under respeaker
export PATH=$PATH:/usr/local/sbin
For reference
/sbin/usr/sbin and /usr/local/sbin are not in the $PATH of regular users by default, because these directories usually contain “dangerous” executable files. Things like fdisk or deluser that require administrator rights and can harm your computer. By default, they should be in the root path, and you root need to run them anyway, so it would be nice not to add them to the $PATH of a regular user.
After we have done the export export PATH=$PATH:/usr/local/sbin, we go with root rights
sudo su
and we do the following
sudo systemctl --system enable rhasspy.service
sudo systemctl --system start rhasspy.service
sudo systemctl --system status rhasspy.service
Background information. Commands for managing the rhasspy.service service
sudo systemctl --system disable rhasspy.service
sudo systemctl --system enable rhasspy.service
sudo systemctl --system start rhasspy.service
sudo systemctl --system stop rhasspy.service
sudo systemctl --system restart rhasspy.service
sudo systemctl --system status rhasspy.service
Restarting the daemon
systemctl daemon-reload
If you see in the messages when you start sudo systemctl --system status rhasspy.service that access is denied, then another user has been assigned to the folder /home/respeaker/.config/rhasspy/, you need to assign the respeaker user to the folders and also add them to the respeaker group
Installing Pixel King. Documentation outdated and there is an error during installation, below is the current information for installation
git clone --depth 1 https://github.com/respeaker/pixel_ring.git
cd pixel_ring
pip install setuptools-scm
pip install -U -e .
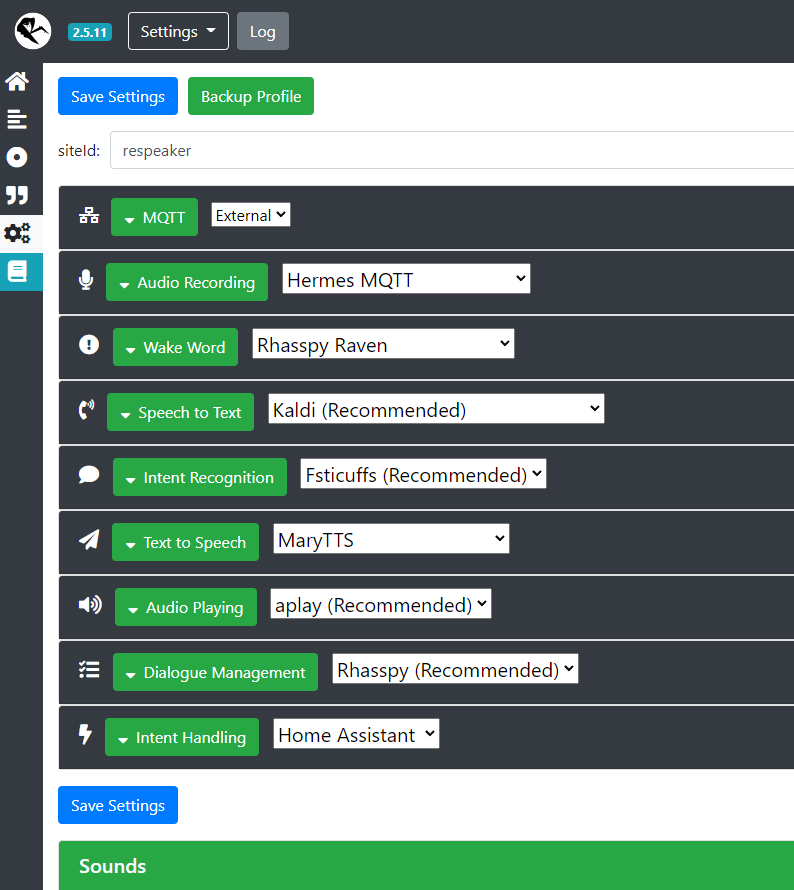
The hardware on ReSpeaker Core v2.0 is weak and it cannot ensure the normal operation of Rhasspy, so if we use Rhasspy inside ReSpeaker Core v2.0, then ReSpeaker Core v2.0 will be loaded by 90-100% and Rhasspy will work very slowly. It is best to use Raspeaker Core v2.0 as a satellite, and the main server will be Home Assistant. Be sure to configure MQTT
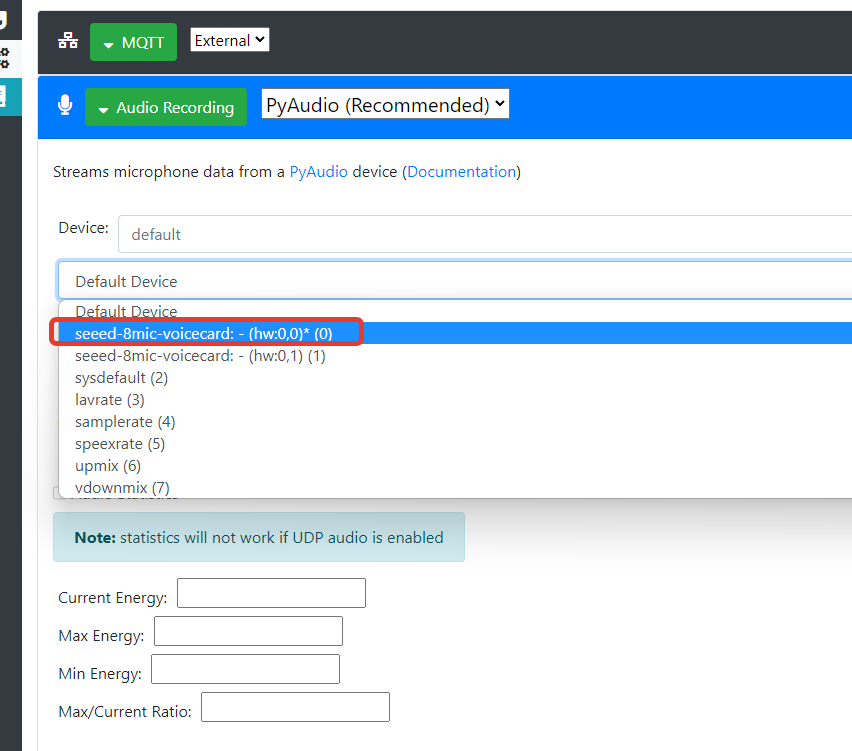
In the settings, turn off everything except the microphone and give the SiteID the name raspeaker
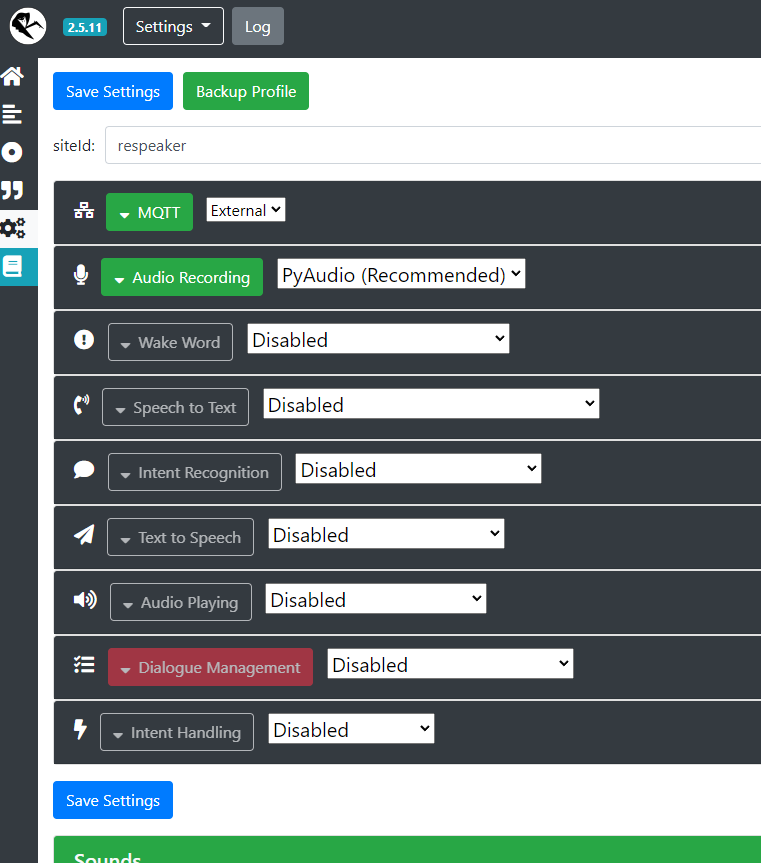
In the Rhasspy Assistant Home Assistant addon, we specify our respeaker satellite
Текст на русском (Text in Russian)
Имеется у меня ReSpeaker Core v2.0 и столкнулся с множеством проблем. Документация для ReSpeaker Core v2.0 есть, но там не пишется как поставить Rhasspy 2.5.11, а сам образ для ReSpeaker Core v2.0 устарел и не подходит для Rhasspy 2.5.11, так как Rhasspy 2.5.11 не ставится на Debian 9. Я потратил много времени и разобрался как установить Rhasspy 2.5.11 на ReSpeaker Core v2.0. Ниже будет актуальная инструкция на 20.03.2023 и в будущем эта инструкция может быть уже не актуальной.
Устанавливаем Debian 9 на SD карту, а не на emmc. Почему так? Потому что не хватит места. emmc с 4 гб места не хватит для разворачивания Rhasspy. Из 4 гб свободного останется 200-400 мб места, что критично мало.
Используем этот образ respeaker-debian-9-iot-sd-20180801-4gb.img.xz и скачать его можно тут
Ставим по этой инструкции, статья актуальная
Image Installation
Similar to the Raspberry Pi, you need to install the ReSpeaker Core v2.0 image from an SD card to get up and running. We offer two ways to boot the Respeaker core v2.0. You can either boot from the SD card or boot from the eMMC.
A. Boot from the SD card
-
Step 1. Click the mirror-azure to download our latest image zip files:
respeaker-debian-9-lxqt-sd-********-4gb.img.xzorrespeaker-debian-9-iot-sd-********-4gb.img.xz.
| Section | Description |
|---|---|
| iot / lxqt | The lxqt version comes with a desktop GUI while the iot version does not. If you are new to ReSpeaker Core v2.0, lxqt version is recommended. |
| flasher / sd | The flasher version is used to flash the onboard eMMC, after flashing you can remove the SD card. The sd version will require the SD card to stay inserted all the time. |
For development, we recommend the lxqt + sd version. So please download the respeaker-debian-9-lxqt-sd-[date]-4gb.img.xz file.
CAUTION
This wiki is based on the respeaker-debian-9-lxqt-sd-20180610-4gb.img.xz image version.
- Step 2. Plug the SD card into your PC or MAC with an SD card reader. You need an SD card with a capacity of more than 4G.
-
Step 3. Click to download Etcherhere, and burn the
*.img.xzfile directly to your SD card with Etcher. Or unzip the*.img.xzfile to a*.imgfile, then burn it to SD card with other image writing tools.
Click the Plus icon to add the image you just download, the software will automatically select the SD card you plug.Then click Flash! to start burning. It will take about 10 minutes to finish.
- Step 4. After writing the image to the SD card, insert the SD card in your ReSpeaker Core v2.0. Power the board using the PWR_IN micro usb port and DO NOT remove the SD card after powering on. ReSpeaker Core v2.0 will boot from the SD card, and you can see USER1 and USER2 LEDs light up. USER1 is typically configured at boot to blink in a heartbeat pattern and USER2 is typically configured at boot to light during SD card accesses. Now, you should go to the next part: Serial Console.
После того, как успешно запустили Debian 9.5 на ReSpeaker Core v2.0, нам необходимо расширить корневой раздел если мы используем SD карту больше 4 гб. Это делать обязательно, так как по умолчанию нам выдается 4 гб места, а моя SD карта имеет объем 32 гб, а мне выделяется 4 гб, что критично мало и это надо исправить.
Выводим список блочных устройств, подключенные к операционной системе
lsblk
Находим наш загрузочный раздел, примерно выглядит вот так.
/dev/mmcblk0p2 3.1G 2.5G 467M 85%
Зная, что размер неверный и он должен быть больше, чем есть, то нужно изменить размер. Изменить размер
sudo cfdisk /dev/mmcblk0
Выбираем наш диск нужного размера и выходим
На выходе должно получится вот так
При желании можете сменить учетные данные. Учетные данные по умолчанию, после установки образа
Логин: respeaker
Пароль: respeaker
Сменить пароль на свой
sudo su
passwd respeaker
Теперь нам нужно обновить Debian c 9 версии на Debian 10 версии. Это нужно для того, чтобы запустить Rhasspy 2.5.11. Процесс длительный, так что набираемся терпения. Обязательно при обновлении используем текущие настройки и везде выбираем N
Проверим текущую версию Debian
lsb_release -a
Выполним обновление всех доступных к обновлению пакетов из репозиториев Stretch
apt-get update
apt-get upgrade
Подключаем репозитории Debian 10 и обновляем пакеты
Удаляем старые репозитории для Debian 9 и добавим репозитории для Debian 10
echo -n > /etc/apt/sources.list
nano /etc/apt/sources.list
Добавляем репозитории для Debian 10
deb http://deb.debian.org/debian buster main contrib non-free
deb http://deb.debian.org/debian buster-updates main contrib non-free
deb http://deb.debian.org/debian-security buster/updates main contrib non-free
deb http://deb.debian.org/debian buster-backports main contrib non-free
Обновим кеш менеджера пакетов и выполним первичное обновление пакетов
apt-get update
apt-get upgrade
Обновляем систему до Debian 10
apt-get dist-upgrade
После успешного окончания установки всей пакетной базы новой версии удаляем устаревшие файлы неиспользуемых пакетов:
apt-get autoremove
Проверяем версию ОС, должна быть версия Debian 10
lsb_release -a
Перезагружаем
sudo reboot
После установки Debian 10 у нас не будут работать микрофон и динамики. Чтобы это заработало, необходимо установить драйвера для работы звуковой карты seeed-8mic-voicecard. Документация про seeed-voicecard
git clone https://github.com/respeaker/seeed-voicecard
cd seeed-voicecard
sudo ./ubuntu-prerequisite.sh
sudo reboot
Установка Rhasspy Voice Assistant на Debian 10
cd
wget https://github.com/rhasspy/rhasspy/releases/download/v2.5.11/rhasspy_armhf.deb
sudo apt install ~/rhasspy_armhf.deb
После установки сделаем простую настройку mosquitto
sudo nano /etc/mosquitto/conf.d/mosquitto.conf
Добавляем в mosquitto.conf
listener 1883
allow_anonymous true
Запускаем mosquitto
sudo systemctl is-enabled mosquitto
Проверяем статус
sudo systemctl status mosquitto
Пробный запуск
PATH="$PATH:/usr/sbin" rhasspy --profile ru
Если запустите rhasspy --profile ru, то получите сообщение про невозможность подключения к mqtt
Если запуск прошел успешно, то необходимо добавить в автозапуск. Создадим службу для запуска rhasspy
Создадим файл-службу rhasspy.service
nano /etc/systemd/system/rhasspy.service
Добавим запись
[Unit]
Description=Rhasspy Service
After=network-online.target

[Service]
Type=simple
User=respeaker
Group=respeaker
WorkingDirectory=/home/respeaker/.config/rhasspy/
ExecStart=/bin/bash -lc '/usr/bin/rhasspy --profile ru 2>&1 | cat'

StandardOutput=syslog
StandardError=syslog
SyslogIdentifier=rhasspy
Restart=on-failure
RestartSec=30

[Install]
WantedBy=multi-user.target
Перед тем, как запустим службу, необходим выполнить с правами respeaker. Если вы находитесь под root, то нам нужно выйти из под root, просто набрав exit. Команду строго запускать из под respeaker
export PATH=$PATH:/usr/local/sbin
Для справки
/sbin/usr/sbin и /usr/local/sbin по умолчанию не находятся в $PATH обычных пользователей, потому что эти каталоги, как правило, содержат “опасные” исполняемые файлы. Такие вещи, как fdisk или deluser которые требуют прав администратора и могут нанести вред вашему компьютеру. По умолчанию они должны быть в root path, и вам root все равно нужно их запускать, поэтому было бы неплохо не добавлять их в $PATH обычного пользователя
После того, как сделали экспорт export PATH=$PATH:/usr/local/sbin, заходим с правами root
sudo su
и выполняем следующее
sudo systemctl --system enable rhasspy.service
sudo systemctl --system start rhasspy.service
sudo systemctl --system status rhasspy.service
Справочная информация. Команды для управления службой rhasspy.service
sudo systemctl --system disable rhasspy.service
sudo systemctl --system enable rhasspy.service
sudo systemctl --system start rhasspy.service
sudo systemctl --system stop rhasspy.service
sudo systemctl --system restart rhasspy.service
sudo systemctl --system status rhasspy.service
Перезапуск демона
systemctl daemon-reload
Если при запуске sudo systemctl --system status rhasspy.service в сообщениях видите, что доступ запрещен, значит папке /home/respeaker/.config/rhasspy/ присвоен другой пользователь, необходимо папкам присвоить пользователя respeaker а также добавить в группу respeaker
Установка Pixel Ring. Документация устарела и есть ошибка при установке, ниже актуальная инфа на установку
git clone --depth 1 https://github.com/respeaker/pixel_ring.git
cd pixel_ring
pip install setuptools-scm
pip install -U -e .
Железо на ReSpeaker Core v2.0 слабое и оно не может обеспечить нормальную работу Rhasspy, поэтому, если мы будем использовать Rhasspy внутри ReSpeaker Core v2.0, то ReSpeaker Core v2.0 будет нагружен на 90-100% и Rhasspy будет работать очень медленно. Лучше всего использовать ReSpeaker Core v2.0 как спутник, а основным сервером будет Home Assistant. Обязательно настраиваем MQTT
В настройках выключаем все, кроме микрофона и даем siteId имя respeaker
В аддоне Rhasspy Assistant Home Assistant указываем наш спутник respeaker